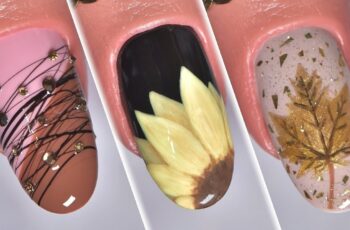
DIY Nail Art Ideas: Creative Designs with Beetles Nail Art
If you’re looking to elevate your nail game, DIY nail art is the perfect way to express your creativity and style. In this guide, we’ll explore a range of DIY nail art ideas using Beetles Nail Art products. Whether you’re a beginner or a seasoned pro, these tips and techniques will help you create stunning designs right at home.
Getting Started with DIY Nail Art
Before you start creating your nail art masterpiece, it’s important to gather all the necessary tools and products. Here’s a list of what you’ll need:
- Beetles Nail Art Kit: (amzn.to/4ekIQHg) Most Items Below Are In The This Kit.
- Beetles Gel Polish: Choose your favorite colors.
- Base Coat and Top Coat: For a smooth and long-lasting finish.
- Nail Art Brushes: For detailed designs. (amzn.to/4gIE1ZW)
- Dotting Tools: To create dots and other intricate patterns.
- Nail Stickers and Decals: For easy and quick designs.
- UV/LED Lamp: To cure the gel polish. (amzn.to/3MXfrai)
Why Choose Beetles Nail Art for DIY Nail Art?
Beetles Nail Art products are a favorite among nail enthusiasts for their high quality, vibrant colors, and long-lasting formulas. From gel polishes to nail art tools, Beetles offers everything you need to create beautiful and unique nail designs. Plus, their products are cruelty-free, making them a great choice for conscious consumers.
Step-by-Step Guide to DIY Nail Art
1. Prepare Your Nails
Start by cleaning your nails and removing any old polish. Shape your nails using a nail file and push back your cuticles. Apply a base coat to protect your natural nails and ensure the gel polish adheres properly.
2. Apply the Base Color
Choose a base color from your Beetles Gel Polish collection. Apply a thin layer and cure it under the UV/LED lamp for the recommended time. Repeat this step for a more opaque finish.
3. Create Your Design
Now comes the fun part – creating your nail art design! Here are a few DIY nail art ideas to get you started:
- Polka Dots: Use a dotting tool to create polka dots on your nails. You can use contrasting colors for a bold look or stick to a monochromatic palette for a more subtle design.
- Stripes: Use a thin nail art brush to paint stripes on your nails. You can create vertical, horizontal, or diagonal stripes depending on your preference.
- Floral Designs: Use a combination of nail art brushes and dotting tools to create beautiful floral patterns. Start with a base color and add petals and leaves using different shades of Beetles Gel Polish.
- Geometric Patterns: Experiment with geometric shapes like triangles, squares, and diamonds. Use nail tape to create clean lines and sharp edges.
4. Add Finishing Touches
Once you’re satisfied with your design, it’s time to add the finishing touches. Apply a top coat to seal your design and give it a glossy finish. Cure the top coat under the UV/LED lamp for the recommended time.
5. Clean Up
Use a small brush dipped in nail polish remover to clean up any mistakes or excess polish around your nails. This will give your DIY nail art a professional look.
Tips for Long-Lasting DIY Nail Art
- Avoid Water: Try to avoid exposing your nails to water for at least a few hours after applying the gel polish. This will help the polish set properly and last longer.
- Moisturize: Keep your cuticles and hands moisturized to prevent your nails from becoming dry and brittle.
- Touch-Ups: If you notice any chips or cracks, do a quick touch-up with the same color and apply a fresh layer of top coat.
Conclusion
DIY nail art is a fun and creative way to express yourself. With Beetles Nail Art products, you can achieve stunning designs that look like they were done by a professional. Follow this guide, experiment with different techniques, and most importantly, have fun with your nail art journey!


